
The Ikea cabinet planner is an excellent tool for designing your kitchen layout. If you use it correctly, it can save you a lot of time and hassle.
The Ikea kitchen planning tool allows you to place cabinets in a 3D space. The software can help you avoid mistakes that would be difficult to correct once the cabinets are installed.
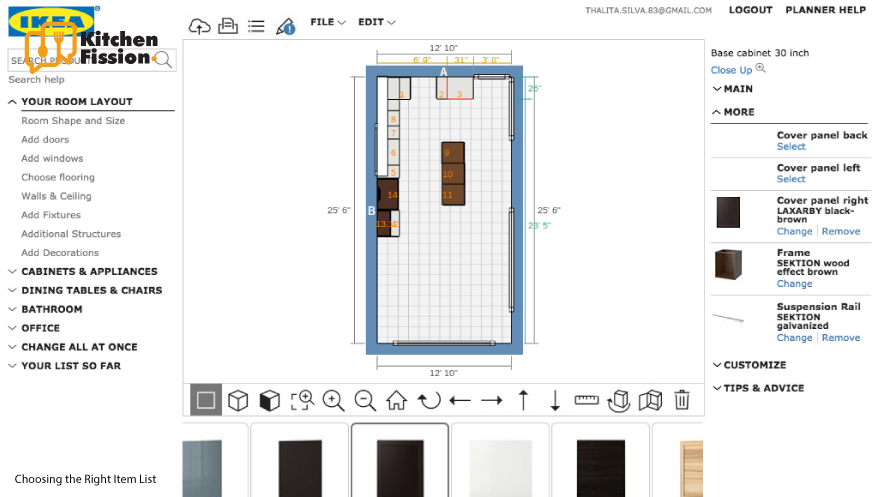
Choosing the Right Item List
Once you have your measurements and floor plan drawn up, you can start creating your IKEA Kitchen in the 3D Planner. This is where it’s crucial to pay close attention to the details. A 1/4 inch here and a 1/2 inch there can add up to unexpected gaps when it comes time to install your cabinets.
When you begin to create your new IKEA kitchen layout, be sure to add all of the cabinet types that you’ll need. This includes wall cabinets (designed to hang above the countertops) and base cabinets, which are designed to sit underneath the countertop. It’s also important to include all of the other upper items you’ll need like shelves, drawers and more.
As you work on adding all of the different items, it’s a good idea to keep the IKEA Cabinet Planner’s Position Button in mind. This will allow you to see if any items are blocking other items and potentially leaving unexpected gaps in your final design. It’s a good idea to click the Position button every time you move an item, as this will give you a quick look at how the item is positioned in relation to everything else around it.
Base cabinets (the lower cabinets that are designed to sit underneath the countertop) come in two depths – 15″ and 24″. You’ll want to choose the deeper option for most kitchens, as it will give you more storage space inside of the cabinet. Once you’ve added all of the base cabinets, it’s time to think about adding the other upper items like shelves and drawers (click the cabinet and select customize).
Finally, it’s a good idea to finish off your IKEA kitchen planner with the rest of the accessories that will make your kitchen complete, such as counter tops, sinks, faucets and more. It’s also a good idea to save your IKEA Kitchen Planner before ordering custom fronts for your cabinets, as this will provide the necessary information to the custom cabinet maker. If you’re not ready to order the fronts, you can always log out of your IKEA Kitchen Planner and start over when you are.
Choosing the Right Cabinets
As with any kitchen remodel, choosing the right cabinets is key to a successful project. There are many different options available to homeowners, including both stock and custom cabinets. While stock cabinets may be less expensive, they can often limit the number of design choices you have. Custom cabinets, on the other hand, can offer more customization and a better fit for your space. However, the additional cost of custom cabinets can add up quickly. To help avoid surprises, it’s important to create a realistic budget and include all anticipated costs.
IKEA offers a wide range of cabinet sizes and materials. One of the most important factors is the cabinet width, which can have a major impact on both the functional and aesthetic aspects of your kitchen. Standard cabinet widths are available in a variety of lengths, ranging from 12 inches to 36 inches. These dimensions work well in most kitchens, but they can be inconvenient if your space has a unique layout or specialized storage requirements.
Another consideration is the type of cabinet legs. IKEA offers plastic legs with adjustable heights that are easy to install and hide with plinth strips. The company also has metal legs with screw-type adjustment and sturdy bases that provide a more traditional look. If you choose wooden legs, be sure to order extra cover panels to protect the wood and make up for any exposed ends.
In terms of cabinet doors, IKEA offers both plain and stained finishes. You can also customize the color and grain of your doors by adding moldings or paint. The company also offers a line of handles and knobs that can give your cabinets a more personalized touch. Finally, you can add under-cabinet lighting to enhance both functionality and ambiance.
It’s also important to consider the overall quality of IKEA cabinets. While they are generally considered to be durable, they can still be damaged by excessive humidity or exposure to direct sunlight. To prevent this, it’s a good idea to keep humidity levels low and keep appliances away from cabinets. Additionally, you should regularly wipe down your cabinets to prevent condensation from building up.
Choosing the Right Finish
IKEA kitchen planners are designed to help you plan a functional and aesthetically pleasing space on a budget. They can be used to plan cabinet heights, door openings and drawer placements as well as make adjustments for appliances, sinks, vent hoods and more. They also include an interior drawer feature, which makes it easy to store items that are out of sight.
Choosing the right cabinet finish is important for your design. IKEA offers a variety of cabinet finishes, including acrylic paint and plastic foil. Acrylic paint is a good choice because it is easy to clean and is resistant to water, heat and stains. It is also durable and can stand up to heavy use. Plastic foil is a more affordable option and comes in a wide range of colors and styles. It is a good choice for families with children, who may need to wash their cabinets frequently.
When selecting a cabinet colour, keep in mind the overall lighting in the room. Darker shades tend to make rooms appear darker, while lighter colours can help to brighten up the space. The size of the room should also be taken into consideration when determining the best cabinet colour.
Another important thing to consider when selecting a cabinet finish is how it will look with your counters and flooring. IKEA has several different countertop options to choose from, and the planner can be used to see how they will look with your chosen cabinet colour. Once you have selected a cabinet finish, it is a good idea to test out your cabinet doors and hardware in person. This will help you ensure that everything is working properly before ordering any materials.
Another important aspect to consider when using an IKEA cabinet planner is the number of fillers you want to use. Fillers are pieces that are used to cover up the gap between two cabinet boxes, and they can be quite expensive. It is important to minimize the number of fillers you use, and an experienced IKEA kitchen designer can help you do this.
Choosing the Right Accessories
IKEA cabinet planners are great tools for DIYers but they can have some quirks that may catch out even the most seasoned kitchen designers. These little differences can cause big headaches if not accounted for in the planning process.
The most obvious difference is that IKEA wall cabinets are a fixed height, unlike traditional builders that offer adjustable-height cabinets. This means you will have to plan for a ceiling that is 96” tall or higher in order to use the full length of the cabinet. This can make planning your cabinets a bit trickier than with other tools, but there are ways to work around it.
Another trick to keep in mind when using the IKEA cabinet planner is that the tool does not autosave, so saving often is important. You should also be sure to save before making any major changes. This will prevent you from losing your work in the event that the planner crashes. Additionally, it is a good idea to save the plan as often as possible, at least every 15 minutes or so.
Lastly, IKEA’s standard base cabinets are 30” high and come in different widths (21”, 18”, 24”, 36”). It can be tricky to figure out how much space you will need for your kitchen layout, especially if you want to include corner cabinets or Lazy Susans. Adding these to your planner in advance will help you determine if you need to add in extra cabinet legs or other filler panels to accommodate the corners.
IKEA also includes Toe Kick Panels with their base cabinets and the planner will automatically add these to your item list. While these are necessary to protect the feet of your cabinets from dirt and dust, they take up quite a lot of space in the cabinet and can be removed from the planner if you are not going to be buying them.
If you are not comfortable working with IKEA’s home planner, consider booking an appointment at your local store for a design consultation. They will be able to look at your plans and help you make sure you are ordering all of the items you need, including those that the planner won’t think of like toe kicks or special brackets for drop in sinks.